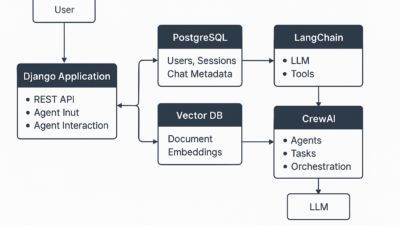
In the era of automation, creating a personalized customer onboarding experience using an AI-powered chatbot can significantly boost user engagement. In this tutorial, we’ll walk you through how to build an AI agent that chats with customers, collects their email addresses, and signs them up — all using Python, Django, and an open-source AI agent framework like LangChain.
🛠️ Tools We’ll Use
- Django – for the backend and database
- LangChain – open-source framework for building conversational agents
- OpenAI or Gemini API – for natural language understanding (you can choose one)
- SQLite/PostgreSQL – for storing user data
- JavaScript (optional) – for chatbot frontend widget (can use open-source ones)
🧠 Step 1: Set Up the Django Project
First, create a new Django project and app.
django-admin startproject chatbot_onboarding
cd chatbot_onboarding
python manage.py startapp onboarding
Add the new app to your INSTALLED_APPS in settings.py:
INSTALLED_APPS = [
    ...
    'onboarding',
]
📦 Step 2: Create the User Model
We’ll use Django’s default User model to manage signups. Alternatively, use a custom user model for more flexibility.
📋 Step 3: Define Views for Chat Interaction
Inside onboarding/views.py:
from django.http import JsonResponse
from django.contrib.auth.models import User
from langchain.chat_models import ChatOpenAI  # or ChatGoogleGemini for Gemini
from langchain.agents import initialize_agent, Tool
from langchain.memory import ConversationBufferMemory

llm = ChatOpenAI(temperature=0)  # Replace with your chosen model
memory = ConversationBufferMemory(memory_key="chat_history", return_messages=True)

def create_user(email):
    user, created = User.objects.get_or_create(username=email, email=email)
    return created

tools = [
    Tool(
        name="SignUpTool",
        func=lambda email: "✅ User created!" if create_user(email) else "⚠️ User already exists.",
        description="Use this to sign up a user with their email address.",
    )
]

agent = initialize_agent(
    tools, llm, agent="chat-conversational-react-description", memory=memory, verbose=True
)

def chat_view(request):
    user_message = request.GET.get("message", "")
    if not user_message:
        return JsonResponse({"response": "Please enter a message."})

    response = agent.run(user_message)
    return JsonResponse({"response": response})
🌐 Step 4: Set Up the URL Endpoint
In onboarding/urls.py:
from django.urls import path
from .views import chat_view

urlpatterns = [
    path("chat/", chat_view, name="chat"),
]
And include this in your main urls.py:
from django.urls import path, include

urlpatterns = [
    path("api/", include("onboarding.urls")),
]
🧪 Step 5: Test It with a Simple Frontend (Optional)
Create a basic HTML page to interact with the bot:
<!DOCTYPE html>
<html>
<head>
  <title>AI Onboarding Chat</title>
</head>
<body>
  <h2>Chat with AI</h2>
  <input type="text" id="userInput" placeholder="Type your message..." />
  <button onclick="sendMessage()">Send</button>
  <div id="chatBox"></div>

  <script>
    async function sendMessage() {
      const msg = document.getElementById("userInput").value;
      const res = await fetch(`/api/chat/?message=${encodeURIComponent(msg)}`);
      const data = await res.json();
      document.getElementById("chatBox").innerHTML += `<p><b>You:</b> ${msg}</p><p><b>Bot:</b> ${data.response}</p>`;
    }
  </script>
</body>
</html>
✅ How the Bot Works
This conversational agent uses LangChain’s memory to keep track of the chat. Once the user says something like “I want to sign up” or shares their email, the bot detects it and uses the SignUpTool to create a new Django user.
Example interaction:
User: Hi, I want to join
Bot: Sure! Can I have your email address?
User: jane@example.com
Bot: ✅ User created!
🔐 Security Tips
- Validate and sanitize email input
- Add reCAPTCHA to prevent abuse
- Use Django’s built-in authentication for login flows
🧩 Optional Enhancements
- Use Django Rest Framework for structured APIs
- Deploy with Docker + Gunicorn + Nginx
- Store chat history per user
- Integrate with Mailchimp or SendGrid to send welcome emails
🚀 Final Thoughts
Using open-source tools like Django and LangChain, you can quickly spin up smart AI agents that don’t just chat — they take action. This tutorial shows just the beginning; you can expand this system to onboard users, collect preferences, recommend plans, and more.
Start building today and make your customer experience smarter and more engaging!